Mass Adjustment Tool: Add-Remove-Adjust-Conversions
This article will cover the following:
- Where to access the mass adjustment tool
- Step by step walkthrough of how to adjust price using the mass adjustment tool
Accessing the tool
Legacy Navigation: To access the Mass Adjustment tool hover over either the main Affiliate or Advertiser tab > from the drop down select Mass Adjustment

New Navigation:
You can navigate to the ACTIONS Menu found in the upper right corner of your instance and click on the three vertical dots to open the menu. The first option is Mass Adjustment.

Step 1 - Mass Adjustment Type

After clicking on Mass Adjustment from the drop down you will be directed to step 1 of the mass adjustment wizard.
In step 1 you choose the type of adjustment that you wish to make. You can choose to:
- Add Conversions
- Remove Conversions
- Adjust Conversions
Note: When Events are enabled(Setup > Settings > Tracking Settings > Enable Events) the Adjustment Type will update adding "/Events" to the end of the Adjustment Type.
Step 2 - Mass Price Adjustment
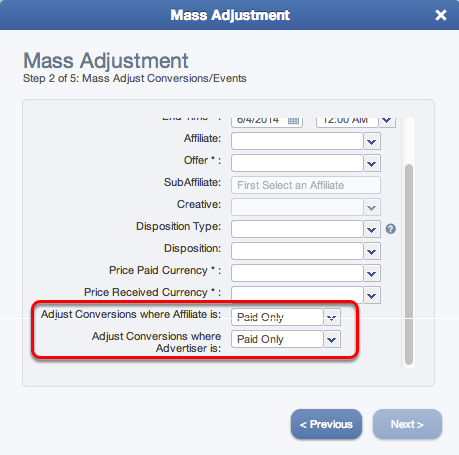
In Step 2 - enter the information for the conversion(s) that you wish to update. (i.e. Date range, Affiliate, Campaign, SubAffiliate, Creative, and "Adjust where Affiliate is" and "Adjust where Advertiser is" fields) - required fields are marked with an *
Adjust Conversions where Affiliate is & Adjust Conversions where Advertiser is:
The drop down associated with each of these options is to identify the payment or non-payment of a conversion. Above is an example of when you would want CAKE Basic to find the conversions where the Affiliate is Paid and Unpaid and the Advertiser is Paid and Unpaid.
Note: When selecting Paid and Unpaid, that is essentially saying find all conversions in the given date range(by all the other selected options in this wizard).
Step 3
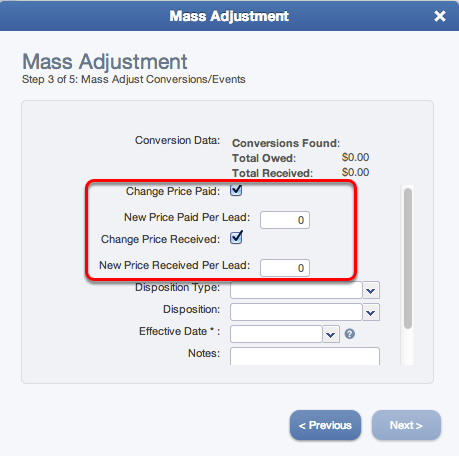
When enabled the change price paid check box will expand the "New Price Paid Per Lead", here you can input the New pay out per conversion.
When enabled the Change Price Received check box will expand the "New Price Received Per Lead", here you can input the New Price Received Per conversion.
- The Mark as Returned to Affiliate drop down will mark these conversion as returned in reporting. Be sure to setup your Return settings when using the Return feature. Setup> Settings> LeadGen Settings> Rejects and Returns
*Note: When setting "Change Price Paid" to '0', a new dropdown option will appear called "unpaid_disposition". Adding an Unpaid Disposition to $0 paid conversions wil hide those conversion from the Affiliate Portal.

Effective Date

At Step 3 there is a field called Effective Date which we will take the opportunity to describe in more depth now.
The Effective Date allows you to apply your adjustments to a specific time for Accounting Purposes. it is important to take note of how you will be implementing the Effective Date as this has direct impact on your Accounting.
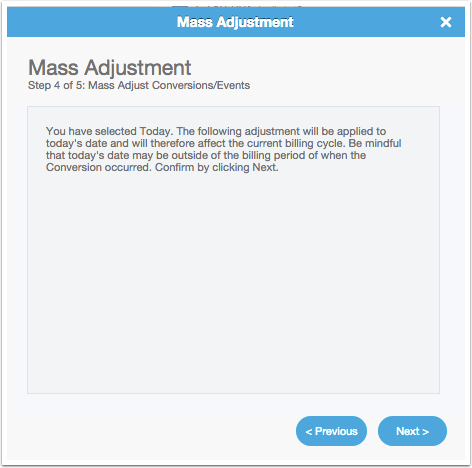
Today: This will apply the adjustment being made to today's date. Be mindful that if "today" is not in the same billing period as the original conversion date, any Revenue or Cost being adjusted will not affect this bill. Consequently, it will affect the current billing cycle.
Conversion Date: This will apply the adjustment to the original date the Conversion(s) occurred and will apply to the bill associated to the date the Conversion(s) occurred in.
Custom: This allows you to choose a custom date when the adjustments occur. You can not adjust conversions to a date before the original conversion event or in the future.
Note: This will apply to LTV changes in the future.
Step 4
Step 4 - depending on what you chose for the Effective Date drop down - messaging related to the option that you chose will appear. If you agree with the action(s) that will apply to the conversions, select Next. If you would like to change the Effective Date option, select the Previous button to return to Step 3.